Admin
Extend the Aero admin with slots, Vue components, filters, reports, resource lists, dashboard lenses, and transformers.
In this guide
- Admin slots
- Transformers
- Resource lists
- Inject slot views
- Available admin slots
- Vue components
- Vue in admin
- Redactor clips
- Transformer data
- Available transformers
- Product picker
- Product picker events
- Product picker props
- Default resource lists
- Extend resource lists
- Create resource lists
- Product list columns
- Order list columns
- Bulk actions
- Custom bulk actions
- Admin filters
- Searchable select filters
- Dropdown filters
- Options date range filters
- Date range filters
- Checkbox list filters
- Custom admin filters
- Dashboard lenses
- Default dashboard lenses
- Custom dashboard lenses
- Dashboard lens views
- Add dashboard lenses
- Remove dashboard lenses
- Extend reports
- Custom reports
- Report exporters
- Report filters
- Report lenses
- Report tables
Introduction to backend admin slots
Slots allow for a module to include its own view on existing admin pages.
See our section on backend admin slots for more information.
Introduction to transformers
Transformers are used by the admin on some edit pages to transform data from PHP into an json encoded array that can be passed to Vue.
See our section on admin transformers for more information.
Introduction to resource lists
Resource lists allow a table to be extended through additional columns, filters, or sort bys and for bulk actions to be applied.
Please see our section on resource lists for more information.
How do I inject a view into a backend admin slot?
Any view you wish to inject into a slot should be defined in a Service Provider.
If the code is unique to a particular store it could be placed in the boot method of the AppServiceProvider. If it is to be included as part of a module, then it can be added in the setup method of the module's ServiceProvider.
When registering the view to be injected into the slot, you must provide the slot name along with the view, for example:
<?php

namespace Acme\MyModule;

use Aero\Admin\AdminSlot;
use Aero\Common\Providers\ModuleServiceProvider;

class ServiceProvider extends ModuleServiceProvider
{
    public function setup(): void
    {
        AdminSlot::inject('catalog.product.edit.cards', 'my-module::admin-slot');
    }
}
For advanced cases where additional data needs to be passed into your view, a closure can be used. The closure receives a $data parameter that contains the current variables on the page.
AdminSlot::inject('catalog.product.edit.cards', function ($data) {
    // add custom variables to the $data array

    return view('my-module::admin-slot', $data);
});
What are the available backend admin slots?
For more information about using backend admin slots please see our article "How do I inject a view into a backend admin slot?"
The following slots can be injected into.
appscriptslogin.headerlogin.formlogin.footerlogin.footercatalog.product.new.cardscatalog.product.edit.cardscatalog.product.new.header.buttonscatalog.product.edit.header.buttonscatalog.category.new.cardscatalog.category.edit.cardsorders.order.view.header.buttonsorders.order.view.cards.toporders.order.view.cards.middleorders.order.view.cards.bottomorders.order.view.cards.extra.toporders.order.view.cards.extra.infoorders.order.view.cards.extra.middleorders.order.view.cards.extra.bottomcustomer.new.header.buttonscustomer.new.cardscustomer.edit.header.buttonscustomer.edit.cardscustomer.edit.extra.bottomcustomer.edit.extra.sidebarcatalog.attribute-groups.index.header.buttonscatalog.categories.index.header.buttonscatalog.collections.index.header.buttonscatalog.manufacturers.index.header.buttonscatalog.products.index.header.buttonscatalog.tag-groups.index.header.buttonscontent.blocks.index.header.buttonscontent.combinations.index.header.buttonscontent.missing-pages.index.header.buttonscontent.pages.index.header.buttonscontent.redirects.index.header.buttonscustomers.groups.index.header.buttonscustomers.index.header.buttonsdiscounts.edit.cardsdiscounts.edit.extra.sidebardiscounts.edit.header.buttonsdiscounts.index.header.buttonsdiscounts.new.cardsdiscounts.new.extra.sidebardiscounts.new.header.buttonsdiscounts.vouchers.index.header.buttonsorders.index.header.buttonsprice-lists.index.header.buttonssettings.countries.index.header.buttonssettings.currencies.index.header.buttonssettings.customer-tax-groups.index.header.buttonssettings.fulfillment-methods.index.header.buttonssettings.mail.index.header.buttonssettings.order-statuses.index.header.buttonssettings.payment-methods.index.header.buttonssettings.price-groups.index.header.buttonssettings.product-tax-groups.index.header.buttonssettings.shipping-methods.index.header.buttonssettings.subscription-plans.index.header.buttonssettings.tax-rates.index.header.buttonssettings.tax-rules.index.header.buttonssettings.users.index.header.buttonsconfiguration.fulfillment-methods.edit.cardsconfiguration.fulfillment-methods.new.cardsconfiguration.shipping-methods.edit.cardsconfiguration.shipping-methods.new.cardsorders.fulfillment.edit.extra.infoorders.fulfillment.edit.cardsorders.fulfillment.edit.extra.sidebarorders.fulfillment.new.extra.infoorders.fulfillment.new.cardsorders.fulfillment.new.sidebarsubscriptions.subscription.view.extra.formsubscriptions.subscription.view.cardssubscriptions.subscription.view.extra.infosubscriptions.subscription.view.extra.sidebar
How do I add a custom Vue component to the admin?
This repo (https://github.com/aerocargo/admin-example-vue) shows all of the code required to register your own Vue components for the Admin.
You need to add the assetLinks function to your modules service provider so that your modules assets are publicly linkable. An example module service provider can be found here in the repo (https://github.com/aerocargo/admin-example-vue/blob/master/src/ServiceProvider.php).
You also need to make your component .vue file(s) and your main .js file that will register all of the components. An example javascript structure can be found here in the repo (https://github.com/aerocargo/admin-example-vue/tree/master/resources/js).
Once you’ve got your files setup and have built the javascript files (using npm - npm run dev or npm run production), you need to ensure that your module's components javascript file is loaded and the components are registered in the Blade view where you want to use the component(s). To do this you need to include the javascript file from your module and then register the components through the window.AeroAdmin.vue.use method.
@push('scripts')
   <script src="{{ asset(mix('components.js', 'modules/aerocargo/admin-example-vue')) }}"></script>
   <script>
       window.AeroAdmin.vue.use(window.exampleAdminComponents);
   </script>
@endpush
Once you have completed this you’ll be able to use your custom Vue component(s) anywhere in the Blade file where you have registered them.
How do I use Vue in the admin?
When in an admin's Blade view file you can use any Vue directive (such as v-for, v-if, @click etc).
Putting Vue into Dev Mode
Putting Vue into dev mode allows you to use the Vue dev tools. You can put the Admin Vue into dev mode by putting this code snippet in your Blade view:
@push('scripts')
   <script>
       window.AeroAdmin.vue.use({
           install(Vue) {
               Vue.config.devtools = true;
           },
       });
   </script>
@endpush
Extending Vue without a Custom Component
You can extend Vue without using a custom Vue component by using some of the window.AeroAdmin methods. Methods are provided for you to add data, methods, computed methods, watchers, and listeners.
Adding Data
You can make data available in Vue through the window.AeroAdmin.addData method. This method expects two parameters, the variable name and the variable value. You can pass JSON as the values for complex data types such as arrays.
@push('scripts')
   <script>
       window.AeroAdmin.addData('myVariable', '{{ old('myVariable', 'value') }}');
       window.AeroAdmin.addData('myOtherVariable', 'Example');
       window.AeroAdmin.addData('myArrayVariable', {!! json_encode(['one', 'two', 'three', 'four']) !!});
   </script>
@endpush
Adding a Method
You can make Vue methods using the window.AeroAdmin.addMethod method. This method expects two parameters, the method name and a closure defining the method. Inside of the closure you can use this to reference the Vue instance (this allows you to call other methods or interact with the data variables (anything you can do from within Vue).
@push('scripts')
   <script>
       window.AeroAdmin.addMethod('test', function (value) {
           console.log(value);
       });

       window.AeroAdmin.addMethod('testing', function (value) {
           this.test(value);
       })
   </script>
@endpush
Adding a Watcher
You can make a Vue watcher using the window.AeroAdmin.addWatch method. This method expects two parameters, the watcher name and a closure defining the watcher. Inside of the closure you can use this to reference the Vue instance (this allows you to call other methods or interact with the data variables (anything you can do from within Vue).
@push('scripts')
   <script>
       window.AeroAdmin.addData('testing', 'value');

       window.AeroAdmin.addMethod('test', function (value) {
           console.log(value);
       });

       window.AeroAdmin.addWatch('testing', function (value) {
           this.test(value);
       })
   </script>
@endpush
Adding a Computed Method
You can make Vue computed methods using the window.AeroAdmin.addComputed method. This method expects two parameters, the computed method name and a closure defining the computed method. Inside of the closure you can use this to reference the Vue instance (this allows you to call other methods or interact with the data variables (anything you can do from within Vue).
@push('scripts')
   <script>
       window.AeroAdmin.addComputed('computedMethod', function () {
           return ['one', 'two', 'three', 'four'];
       });
   </script>
@endpush
Adding a Listener
You can add a listener to Vue using the window.AeroAdmin.addListener method. This method expects two parameters, the event name to listener for and a closure defining what to do when the event is emitted. Inside of the closure you can use this to reference the Vue instance (this allows you to call other methods or interact with the data variables (anything you can do from within Vue).
@push('scripts')
   <script>
       window.AeroAdmin.addListener('loaded', function () {
           console.log('Vue has been loaded');
       });
   </script>
@endpush
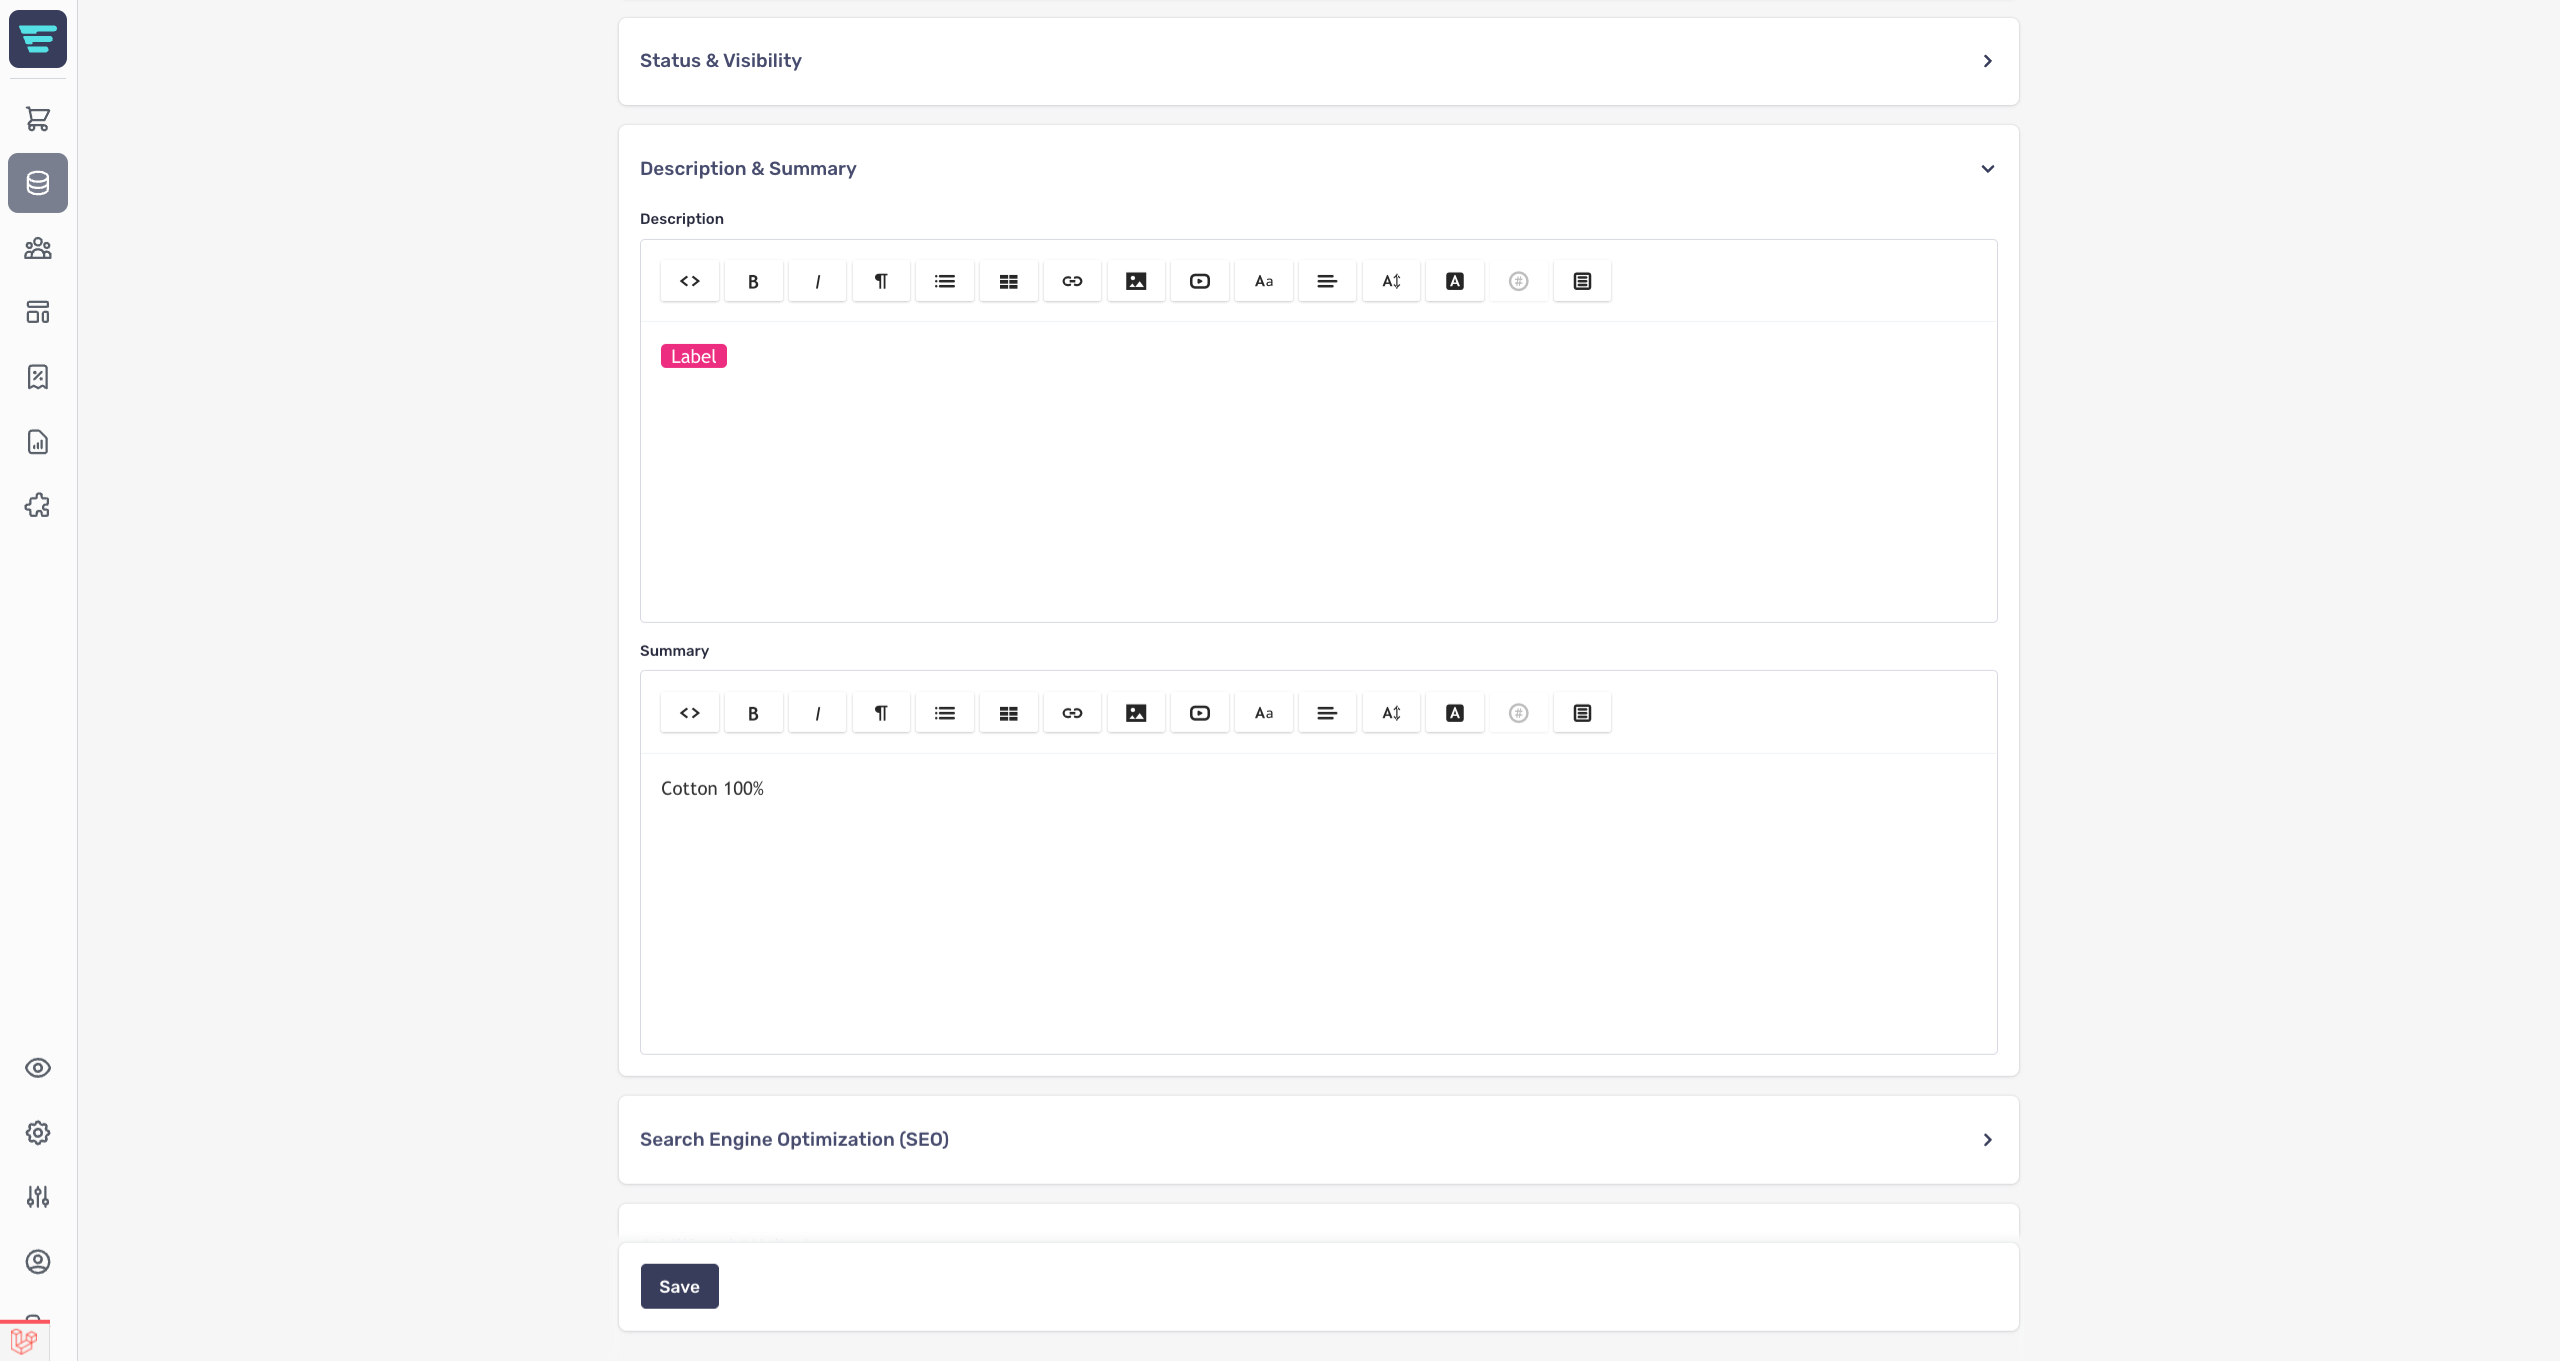
How do I add custom clips to the redactor editor
Clips is a plugin for the Redactor editor that allows you to create a list of frequently used code to be used in the editor.
In the following example we will add a label clip that will allow users to use a label in the Redactor editor that looks like this:
You need to use the styles and scripts slots to inject views across the whole admin that include the CSS for the clip (in this case the CSS for the label) and the JS for creating the clip. This can be done in a module service providers setup method or the app service providers boot method. If you use a module service provider, do not forget to register your views under your modules namespace using the $this->loadViewsFrom method.
<?php

namespace Acme\MyModule;

use Aero\Admin\AdminSlot;
use Aero\Common\Providers\ModuleServiceProvider;

class ServiceProvider extends ModuleServiceProvider
{
   public function setup()
   {
       $this->loadViewsFrom(__DIR__.'/../resources/views', 'my-module');

       AdminSlot::inject('styles', 'my-module::clips-styles');
       AdminSlot::inject('scripts', 'my-module::clips-scripts');
   }
}
The my-module::clips-styles view should contain a style tag with the CSS for the label. Any CSS for a clip should be scoped to the .redactor-box class in this view. You will also need to put this CSS in your themes CSS file so that it works on the storefront (this CSS doesn’t need to be scoped to the .redactor-box class).
<style>
   .redactor-box .label-red {
       display: inline-block;
       background-color: #ec2d80;
       color: #fff;
       line-height: 1;
       padding: 2px 8px;
       border-radius: 4px;
       font-weight: normal;
   }
</style>
The my-module::clips-scripts view should contain a script tag with the JS for the label. The first parameter is the text shown in the clips list and the second parameter is the code inserted when the clip is used.
<script>
   window.RedactorClips.add('Red label', '<b class="label-red">Label</b>');
</script>
Completing these steps will add a clips button to the top of the Redactor editor that when clicked will list your registered clips that can then be clicked to insert their code.
How do I add custom data to a transformer?
To add custom data you need to use the static add() method on the relevant transformer. This method expects a closure that will return an array of the field(s) to merge into the transformers array. The closure will be passed an array of data that you can use.
This code example adds a customField that will have the value of the products ID multiplied by two. This field will then be usable on the product new/edit page directly in Vue like product.customField. It’s important to note that this is used on the new product page where the product will not have an ID and some other data which is why the ?? 0 is used.
<?php

namespace Acme\MyModule;

use Aero\Admin\Transformers\ProductTransformer;
use Aero\Common\Providers\ModuleServiceProvider;

class ServiceProvider extends ModuleServiceProvider
{
   public function setup()
   {
       ProductTransformer::add(function ($data) {
           /* @var \Aero\Catalog\Models\Product */
           $product = $data['product'];

           return [
               'customField' => ($product->id ?? 0) * 2,
           ];
       });
   }
}
Casts
When the admin page fails validation and redirects back with the old data, the old data is casted to ensure it’s correct using the transformer. This is particularly important for booleans where a checkbox may set the value as 1 and it therefore should be casted to true to avoid problems.
Available Cast Types
You can currently use the following casts: boolean, array, string, and integer.
Adding a Cast
To add a cast you need to use the static addCast() method on the relevant transformer. This method expects two parameters, the key of the field and the value that the field should be casted to.
This code example ensures the customField is casted as an integer.
<?php

namespace Acme\MyModule;

use Aero\Admin\Transformers\ProductTransformer;
use Aero\Common\Providers\ModuleServiceProvider;

class ServiceProvider extends ModuleServiceProvider
{
   public function setup()
   {
       ProductTransformer::addCast('customField', 'integer');

       ProductTransformer::add(function ($data) {
           /* @var \Aero\Catalog\Models\Product */
           $product = $data['product'];

           return [
               'customField' => ($product->id ?? 0) * 2,
           ];
       });
   }
}
What are the available transformers?
The following classes are in the Aero\Admin\Transformers namespace.
Class | Description |
AttributeTransformer | This transformer is used in the ProductTransformer to transform the product's attribute groups. |
BaseVariantTransformer | This transformer is used to generate the data for a new variant. |
ProductTransformer | This transformer is used to transform a product for the product new/edit page. |
VariantTransformer | This transformer is used in the ProductTransformer to transform the product's variants. |
DiscountTransformer | This transformer is used to transform a discount for the discount new/edit page. |
How do I use the product picker in my custom module?
The Product Picker provides a modal that lets users select a single or many products/variants with quantities. Parts of the admin use this such as the Price Lists and Create Order form. Modules such as aerocargo/upsells also make use of the Product Picker.
You can use the <product-picker></product-picker> Vue component from any admin view inside of your module that extends the official admin layout (admin::layouts.main). When using the Product Picker you need to provide a url for the get-products-url prop (this value is usually always the admin.catalog.products.picker route) and you need to provide a slot for the button that will be used to open the picker.
@extends('admin::layouts.main')

@section('content')
   <h2>
       <a href="{{ route('admin.modules') }}" class="btn">@include('admin::icons.back') Back</a>
       <span class="ml-4">My Module</span>
   </h2>

   <div class="card">
       <product-picker v-slot="picker"
                       get-products-url="{{ route('admin.catalog.products.picker') }}">
           <a href="#" @click.prevent="picker.open" class="btn">Add Product</a>
       </product-picker>
   </div>
@endsection
What are the available events for the product picker?
| Event
|
Description
| | --- | --- | |
products-selected
|
This event emits when the action button is clicked (bottom right of the modal) and provides an array of all of the selected product(s)/variant(s).
| |
selected
|
This event emits when the action button is clicked (bottom right of the modal) and is emitted for each product/variant that has been selected - only a single product/variant is provided.
|
Example
The usual use-case for the Product Picker is to allow users to select products and/or variants to be added to a list. This example code is a Blade view that allows the user to select up to 5 products or variants and then displays them in a list with a custom message. It also allows the user to remove the selected products/variants. The next steps to make this code fully functional would be to wrap the table in a form and to add a submit button that saves the products/variants.
@extends('admin::layouts.main')

@section('content')
   <h2>
       <a href="{{ route('admin.modules') }}" class="btn">@include('admin::icons.back') Back</a>
       <span class="ml-4">My Module</span>
   </h2>

   <div class="card p-0">
       <table>
           <thead>
               <tr class="header">
                   <th class="whitespace-no-wrap">Model</th>
                   <th class="whitespace-no-wrap">Sku</th>
                   <th class="whitespace-no-wrap">Message</th>
                   <th></th>
               </tr>
           </thead>
           <tbody>
               <tr v-for="(item, index) in list" :key="item.buyable_id + item.buyable_type" v-cloak>
                   <td class="whitespace-no-wrap">
                       <input type="hidden" :name="'items[' + index + '][buyable_id]'" :value="item.buyable_id">
                       <input type="hidden" :name="'items[' + index + '][buyable_type]'" :value="item.buyable_type">
                       <span v-text="item.model"></span>
                   </td>
                   <td class="whitespace-no-wrap" v-if="item.sku" v-text="item.sku"></td>
                   <td class="whitespace-no-wrap" v-else><span class="text-grey">—</span></td>
                   <td class="whitespace-no-wrap">
                       <input type="text" :name="'items[' + index + '][message]'" v-model="item.message" placeholder="Message">
                   </td>
                   <td>
                       <div class="flex items-center justify-end">
                           <a href="#" @click.prevent="list.splice(index, 1)">@include('admin::icons.bin')</a>
                       </div>
                   </td>
               </tr>
               <tr v-if="list.length === 0">
                   <td colspan="4">No data to show</td>
               </tr>
           </tbody>
       </table>

       <product-picker v-slot="picker"
                       v-if="list.length < 5"
                       get-products-url="{{ route('admin.catalog.products.picker') }}"
                       :max-selection="5"
                       :pick-product="true"
                       :emit-name="true"
                       :emit-model="true"
                       :emit-sku="true"
                       @selected="selected">
           <a href="#" @click.prevent="picker.open" class="btn m-4">Add Product</a>
       </product-picker>
   </div>
@endsection

@push('scripts')
   <script>
       window.AeroAdmin.addData('list', []);

       window.AeroAdmin.addMethod('selected', function (item) {
           if (this.findIndex(item.buyable_id, item.buyable_type) === -1) {
               this.list.push({
                   ...item,
                   message: '',
               });
           } else {
               this.$notify({
                   type: 'error',
                   title: (item.sku ?? item.name) + ' has already been added to the list',
               });
           }
       });

       window.AeroAdmin.addMethod('findIndex', function (id, type) {
           return this.list.findIndex((l) => l.buyable_id === id && l.buyable_type === type);
       });
   </script>
@endpush
What are the available props for the product picker?
| Prop
|
Type
|
Description
| | --- | --- | --- | |
get-products-url
|
String
|
This is the only required prop. This is the URL for the API to get the products from. It’s common to set this value to {{ route('admin.catalog.products.picker') }}.
| |
image-url-prefix
|
String
|
This is the image factory prefix to use for the product image URLs. This is set by default to use {{ image_factory(60, 60)->contain() }}.
| |
no-image-url
|
String
|
This is the image URL to use when a product doesn’t have an image. This is set by default to use {{ asset('modules/aerocommerce/admin/no-image.svg') }}.
| |
action-name
|
String
|
This is the button text shown on the confirm button of the product picker modal (bottom right). This is set by default to “Add Products”.
| |
clear-selected-after-emit
|
Boolean
| | |
pick-product
|
Boolean
|
This is a boolean that defaults to false. When true, products will be allowed to be selected as well as variants.
| |
product-only
|
Boolean
|
This is a boolean that defaults to false. When true, variants will not be listed and not selectable.
| |
pick-only
|
Boolean
|
This is a boolean that defaults to false. When true, variants will not need to be in stock to be selectable.
| |
needs-quantity
|
Boolean
|
This is a boolean that defaults to true. When false, a quantity will not be able to be set for the selected variants/products.
| |
emit-image
|
Boolean
|
This is a boolean that defaults to false. When true, the products/variants image will be emitted when selected.
| |
emit-sku
|
Boolean
|
This is a boolean that defaults to false. When true, the products/variants sku will be emitted when selected.
| |
emit-model
|
Boolean
|
This is a boolean that defaults to false. When true, the products/variants model will be emitted when selected.
| |
emit-name
|
Boolean
|
This is a boolean that defaults to false. When true, the products/variants name will be emitted when selected.
| |
emit-price
|
Boolean
|
This is a boolean that defaults to false. When true, the products/variants price will be emitted when selected.
|
Example
You can make use of the props like you usually would with a Vue component. Here is some example code that sets some prop values.
@extends('admin::layouts.main')

@section('content')
   <h2>
       <a href="{{ route('admin.modules') }}" class="btn">@include('admin::icons.back') Back</a>
       <span class="ml-4">My Module</span>
   </h2>

   <div class="card">
       <product-picker v-slot="picker"
                       get-products-url="{{ route('admin.catalog.products.picker') }}"
                       :max-selection="5"
                       :pick-product="true"
                       :emit-name="true"
                       :emit-model="true"
                       :emit-sku="true">
           <a href="#" @click.prevent="picker.open" class="btn">Add Product</a>
       </product-picker>
   </div>
@endsection
What are the default resource lists?
The following classes are in the Aero\Admin\ResourceLists namespace and any class that doesn’t have a view uses the admin::resource-lists.index view.
| Class | View |
|---|---|
| AttributeGroupsResourceList | – |
| BlocksResourceList | – |
| CategoriesResourceList | admin::catalog.categories.index |
| CollectionsResourceList | – |
| CombinationsResourceList | – |
| CountriesResourceList | – |
| CurrenciesResourceList | – |
| CustomerGroupsResourceList | – |
| CustomersResourceList | – |
| CustomerTaxGroupsResourceList | – |
| DiscountsResourceList | – |
| FulfillmentMethodsResourceList | – |
| FulfillmentsResourceList | – |
| MailNotificationsResourceList | – |
| ManufacturersResourceList | – |
| MissingPagesResourceList | – |
| OrdersResourceList | – |
| OrderStatusesResourceList | – |
| PagesResourceList | – |
| PaymentMethodsResourceList | – |
| PriceListsResourceList | – |
| ProductsResourceList | admin::catalog.products.index |
| ProductTaxGroupsResourceList | – |
| RedirectsResourceList | admin::content.redirects.index |
| ShippingMethodsResourceList | – |
| SubscriptionPlansResourceList | – |
| SubscriptionsResourceList | – |
| TagGroupsResourceList | – |
| TaxRatesResourceList | – |
| TaxRulesResourceList | – |
| UsersResourceList | – |
| VouchersResourceList | – |
How do I extend an exisiting resource list?
Adding a New Column
To add columns to a resource list you can use the addColumn, addColumnBefore, or addColumnAfter methods from within the pipeline. These methods return a usual resource list column which allows you to chain on the other available column methods.
addColumn Method
This method accepts a column header and a closure that defines how the column will be rendered. A column added with this method will be added as the first column.
addColumnBefore Method
This method accepts the same parameters as the addColumn method but additionally accepts a third parameter, the key of the column this new column should be added before.
addColumnAfter Method
This method accepts the same parameters as the addColumn method but additionally accepts a third parameter, the key of the column this new column should be added after.
Finding the Current Column Keys
If you do not know the keys of the current columns you can use this code snippet to dump the current keys out.
<?php

namespace Acme\MyModule;

use Aero\Admin\ResourceLists\OrdersResourceList;
use Aero\Common\Providers\ModuleServiceProvider;

class ServiceProvider extends ModuleServiceProvider
{
   public function setup()
   {
       dd((app(OrdersResourceList::class)())->getColumns()->map->key());
   }
}
<?php

namespace Acme\MyModule;

use Aero\Admin\ResourceLists\OrdersResourceList;
use Aero\Common\Providers\ModuleServiceProvider;

class ServiceProvider extends ModuleServiceProvider
{
   public function setup()
   {
       OrdersResourceList::extend(function (OrdersResourceList $list) {
           $list->addColumn('My Column', function($row) {
               return 'Example';
           });

           $list->addColumnBefore('Before Ref', function($row) {
               return $row->reference;
           }, 'order');

           $list->addColumnAfter('After Ref', function($row) {
               return $row->reference;
           }, 'order');
       });
   }
}
Adding a New Filter
To add a filter to a resource list you can use the addFilter method from within the pipeline. This method expects you to pass an admin filter class. You can create an admin filter class as shown in the article "How do I create a custom Admin Filter?".
<?php

namespace Acme\MyModule;

use Acme\MyModule\Filters\CreatedAtAdminFilter;
use Aero\Admin\ResourceLists\OrdersResourceList;
use Aero\Common\Providers\ModuleServiceProvider;

class ServiceProvider extends ModuleServiceProvider
{
   public function setup()
   {
       OrdersResourceList::extend(function (OrdersResourceList $list) {
           $list->addFilter(CreatedAtAdminFilter::class);
       });
   }
}
Adding a New Sort By
To add a sort by to a resource list you can use the addSortBy method from within the pipeline. This method expects you to pass a Aero\Admin\ResourceLists\ResourceListSortBy. You can create a resource list sort by class as shown in the article "How do I create my own Resource List?".
<?php

namespace Acme\MyModule;

use Aero\Admin\ResourceLists\OrdersResourceList;
use Aero\Admin\ResourceLists\ResourceListSortBy;
use Aero\Common\Providers\ModuleServiceProvider;

class ServiceProvider extends ModuleServiceProvider
{
   public function setup()
   {
       OrdersResourceList::extend(function (OrdersResourceList $list) {
           $list->addSortBy(ResourceListSortBy::create([
               'latest' => 'Latest',
               'oldest' => 'Oldest',
           ], function ($sortBy, $query) {
               return $sortBy === 'oldest' ? $query->orderBy('created_at') : $query->orderByDesc('created_at');
           }));
       });
   }
}
How do I create my own resource list?
To create a resource list you need a normal Laravel controller and a class that extends Aero\Admin\ResourceListsAbstractResourceList.
<?php

namespace Acme\MyModule\ResourceLists;

use Aero\Admin\ResourceLists\AbstractResourceList;

class OrdersResourceList extends AbstractResourceList
{
   //
}
Your controller should be like this example but for your new resource list:
<?php

namespace Acme\MyModule\Http\Controllers;

use Aero\Admin\Http\Controllers\Controller;
use Aero\Admin\ResourceLists\OrdersResourceList;
use Illuminate\Http\Request;

class OrdersController extends Controller
{
   public function index(OrdersResourceList $list, Request $request)
   {
       return view('admin::resource-lists.index', [
           'list' => $list = $list(),
           'results' => $list->apply($request->all())
               ->with('status', 'customer', 'items', 'currency')
               ->paginate($request->input('per_page', 24) ?? 24),
       ]);
   }
}
Adding Columns to your Resource List
To add columns to your resource list you need to implement the protected columns() method and make it return an array of your columns. The entries in the array should use the Aero\Admin\ResourceLists\ResourceListColumn::create helper method. This method expects a string parameter for the columns heading, a closure parameter for how to render the columns data (this can return a string), and an optional string parameter for the columns key (by default this is generated from the columns header).
<?php

namespace Acme\MyModule\ResourceLists;

use Aero\Admin\ResourceLists\AbstractResourceList;
use Aero\Admin\ResourceLists\ResourceListColumn;

class OrdersResourceList extends AbstractResourceList
{
   protected function columns(): array
   {
       return [
           ResourceListColumn::create('Order', function ($row) {
               return view('admin::resource-lists.link', [
                   'route' => route('admin.orders.view', array_merge(request()->all(), ['order' => $row])),
                   'text' => '#'.$row->reference,
               ])->render();
           }),
       ];
   }
}
Making Columns Searchable
You can use the setSearchAction method to define how your column is searched. This method accepts a closure (that is passed the query and search term) that defines how the search should happen and an optional string for the text to show in the search field dropdown (this is column header by default).
ResourceListColumn::create('Order', function ($row) {
   return view('admin::resource-lists.link', [
       'route' => route('admin.orders.view', array_merge(request()->all(), ['order' => $row])),
       'text' => '#'.$row->reference,
   ])->render();
})
->setSearchAction(function ($query, $term) {
   $searchTerm = ltrim($search, '#');

   $query->whereLower('reference', 'like', "%{$searchTerm}%");
}, 'Order Reference')
Making Columns Invisible
You can use the invisible method to make your column invisible. The main reason for wanting to do this is to add a search for a column that shouldn’t be rendered.
ResourceListColumn::create('Order', function ($row) {
   return view('admin::resource-lists.link', [
       'route' => route('admin.orders.view', array_merge(request()->all(), ['order' => $row])),
       'text' => '#'.$row->reference,
   ])->render();
})
->invisible()
Handling Searching for your Resource List
When your resource list is searched without a specific column being selected a handleSearch() function will be called to handle the search. The method will be passed the search term and you are able to use $this->query to access the query.
<?php

namespace Acme\MyModule\ResourceLists;

use Aero\Admin\ResourceLists\AbstractResourceList;

class OrdersResourceList extends AbstractResourceList
{
   protected function handleSearch($search)
   {
       $searchTerm = ltrim($search, '#');

       $this->query->whereLower('reference', 'like', "%{$searchTerm}%");
   }
}
Adding Row Views to your Resource List
Row views are additional rows rendered after each complete row (the best example of this is how the order items are listed after each row of the order on the orders page). To add a row view you simply need to provide your view in the protected $rowViews array.
<?php

namespace Acme\MyModule\ResourceLists;

use Aero\Admin\ResourceLists\AbstractResourceList;

class OrdersResourceList extends AbstractResourceList
{
   protected $rowViews = [
       'admin::resource-lists.orders.items',
   ];
}
Adding Buttons to your Resource List Header
Most resource list pages will require a create button. You can easily add buttons to the top of your resource list page by defining a header slot. Once you have defined a header slot you can inject your view using the admin slots helper.
<?php

namespace Acme\MyModule\ResourceLists;

use Aero\Admin\ResourceLists\AbstractResourceList;

class OrdersResourceList extends AbstractResourceList
{
   protected $headerSlot = 'my-list.index.header.buttons';
}
Adding Admin Filters to your Resource List
First you will need to create an Admin Filter class as shown in the artile "How do I create a custom admin filter?".
To register your newly created admin filter with your resource list you need to ensure that your admin filter class is in the resource lists protected static $filters array.
<?php

namespace Acme\MyModule\ResourceLists;

use Aero\Admin\Filters\Order\OrderStatusAdminFilter;
use Aero\Admin\ResourceLists\AbstractResourceList;

class OrdersResourceList extends AbstractResourceList
{
   protected $filters = [
       OrderStatusAdminFilter::class,
   ];
}
Adding Sort Bys to your Resource List
To add sort bys to your resource list you need to implement the protected sortBys() method and make it return an array of your sort bys. The entries in the array should use the Aero\Admin\ResourceLists\ResourceListSortBy::create() helper method. This method expects an array parameter holding the dropdown options that will be shown in the frontend dropdown, and a closure that will be executed when the sort option is active.
<?php

namespace Acme\MyModule\ResourceLists;

use Aero\Admin\ResourceLists\AbstractResourceList;
use Aero\Admin\ResourceLists\ResourceListSortBy;

class OrdersResourceList extends AbstractResourceList
{
   protected function sortBys(): array
   {
       return [
           ResourceListSortBy::create([
               'order-az' => 'Order A to Z',
               'order-za' => 'Order Z to A',
           ], function ($sortBy, $query) {
               return $sortBy === 'order-az' ? $query->orderBy('reference') : $query->orderByDesc('reference');
           }),
       ];
   }
}
If you would like your sort by to be enabled by default then you call pass null for the first parameter like this:
<?php

namespace Acme\MyModule\ResourceLists;

use Aero\Admin\ResourceLists\AbstractResourceList;
use Aero\Admin\ResourceLists\ResourceListSortBy;

class OrdersResourceList extends AbstractResourceList
{
   protected function sortBys(): array
   {
       return [
           ResourceListSortBy::create(null, function ($sortBy, $query) {
               return $query->orderByRaw('coalesce(`orders`.`ordered_at`, `orders`.`created_at`) desc');
           }),
       ];
   }
}
How do I add a custom column to the product list?
As the products list is a resource list you can add a custom column like this:
More information on resource lists can be found in the article "How do I extend an existing Resource List?".
<?php

namespace Acme\MyModule;

use Aero\Admin\ResourceLists\ProductsResourceList;
use Aero\Common\Providers\ModuleServiceProvider;

class ServiceProvider extends ModuleServiceProvider
{
   public function setup()
   {
       ProductsResourceList::extend(function (ProductsResourceList $list) {
           $list->addColumn('My Column', function ($row) {
               return $row->id;
           });
       });
   }
}
How do I add a custom column to the order list?
As the orders list is a resource list you can add a custom column like this:
More information on resource lists can be found in the article "How do I extend an existing Resource List?".
<?php

namespace Acme\MyModule;

use Aero\Admin\ResourceLists\OrdersResourceList;
use Aero\Common\Providers\ModuleServiceProvider;

class ServiceProvider extends ModuleServiceProvider
{
   public function setup()
   {
       OrdersResourceList::extend(function (OrdersResourceList $list) {
           $list->addColumn('My Column', function ($row) {
               return '#'.$row->reference;
           });
       });
   }
}
What is a bulk action?
A bulk action allows for the selection of multiple values from a list, and apply some logic to items that have only been selected. Bulk actions exist for many different Resource Lists, which is what is used for determining items that have been selected.
Bulk actions are usually dispatched as a job, given the bulk nature of the action, which carries out tasks in a sequential manner. There are exceptions to this rule however and Aero can also return responses straight to the browser, e.g. downloading all selected content blocks as a .zip.
How do I create a custom bulk action?
If we wish to add a new bulk action to a screen within the admin, all we have to do is create the bulk action using the BulkAction facade. The bulk action also requires a specific Resource List, for example for Products.
BulkAction::create(BulkActionClass::class, ResourceList::class)
        ->permissions('bulkaction.permission')
        ->title('Title');
The above code would be instantiated within a Service Provider, whether it is a module service provider or the AppServiceProvider.
Example:
If we were to create a new bulk action for exporting products, we would first need to create a class extending BulkActionJob:
BulkAction::create(ExportProducts::class, ProductsResourceList::class)
        ->notRunnable()
        ->permissions('products.export')
        ->title('Export products');
Properties
Bulk Actions have a number of properties, each responsible for affecting a different aspect of the bulk action.
Wide Content
We can choose to display the contents of our bulk action in a wider container, which can prove to be more useful for certain modules. In order to display its contents in a container stretched to the width of the screen, apply the following function to the facade while creating it:
BulkAction::create(BulkActionClass::class, ResourceList::class)
        ->wideContent()
        ->permissions('bulkaction.permission')
        ->title('Title');
Runnable & Not Runnable
Not every bulk action is the same, and it’s possible to remove the Run button from the bulk action in order to replace it with a custom button, for example calling the API. In order to remove the built-in Run button for a particular bulk action, apply the following function to the facade while creating it:
BulkAction::create(BulkActionClass::class, ResourceList::class)
        ->notRunnable()
        ->permissions('bulkaction.permission')
        ->title('Title');
Confirm
We can set the bulk action to prompt the user before performing its intended action by simply chaining a method to the BulkAction creation:
BulkAction::create(BulkActionClass::class, ResourceList::class)
        ->confirm()
        ->permissions('bulkaction.permission')
        ->title('Title');
The prompt will now ask the user if they are sure of their selection.
Title
We can set a custom title/main heading for the bulk action content, this can be done by chaining a function to the facade we use for creating the bulk action, e.g.:
BulkAction::create(BulkActionClass::class, ResourceList::class)
        ->title('Your title')
        ->permissions('bulkaction.permission')
        ->title('Title');
View
Aero has the ability to display a specific view when it performs the bulk action, this can be done by chaining a function to the facade we use for creating the bulk action, e.g.:
BulkAction::create(BulkActionClass::class, ResourceList::class)
        ->view(‘namespace::bulk.form’)
        ->permissions('bulkaction.permission')
        ->title('Title');
What is an admin filter?
Admin filters are the filters that populate the sidebars of reports and resource lists. As the name suggests, they allow users to filter the data they’re seeing through the report or resource list.
All admin filters ultimately extend Aero\Admin\Filters\AdminFilter and therefore all have these common methods that you can optionally override:
title Method
This is a public method that returns the title for the filter. This title is displayed on the frontend. By default the title is generated from the class name.
key Method
This is a public method that returns the key for the filter. The key is used for the request parameter for the filter. By default the key is generated from the class name.
You can read about the other methods in the "How do I create a custom Admin Filter?" article.
How do I create a searchable select admin filter?
To create an options date range admin filter you need to create a class that extends Aero\Admin\Filters\SearchableSelectAdminFilter and implements the handleSearchableSelect, model, modelName, and searchRoute methods.
handleSearchableSelect Method
This method is executed when an option has been selected and accepts 2 parameters. The first parameter is an array of selected values and the second parameter is the query.
model Method
This method needs to return an instance of the model that will be used for searching. This will be used to automatically fetch the selected data.
modelName Method
This method defines the name that should be used in the searchable select for the selected options.
searchRoute Method
This method defines the route that will be used by the searchable select component to fetch data.
<?php

namespace Aero\Admin\Filters\Order;

use Aero\Admin\Filters\SearchableSelectAdminFilter;
use Aero\Cart\Models\Discount;
use Illuminate\Database\Eloquent\Model;

class OrderDiscountAdminFilter extends SearchableSelectAdminFilter
{
   protected $multiple = true;

   protected function handleSearchableSelect(array $selected, $query)
   {
       $query->where(function ($query) use ($selected) {
           $query->whereHas('discounts', static function ($query) use ($selected) {
               $query->whereIn('id', $selected);
           });
       });
   }

   protected function model(): Model
   {
       return new Discount();
   }

   protected function modelName(Model $model)
   {
       return $model->code ?? ($model->name ?? 'Discount #'.$model->id);
   }

   protected function searchRoute(): string
   {
       return route('admin.discounts.search');
   }
}
How do I create a dropdown admin filter?
To create an options date range admin filter you need to create a class that extends Aero\Admin\Filters\DropdownAdminFilter and implements the handleDropdown and dropdowns methods.
handleDropdown Method
This method is executed when a dropdown option is set and accepts 2 parameters. The first parameter is the value selected and the second parameter is the query.
dropdowns Method
This method provides the results shown in the rendered dropdown on the frontend. It needs to return an array that has name and value as keys. If you use an empty string for a value then your handleDropdown method will not be called when that option is selected. This is useful for allowing users to effectively turn your filter off.
<?php

namespace Aero\Admin\Filters\MailNotification;

use Aero\Admin\Filters\DropdownAdminFilter;

class MailNotificationLayoutAdminFilter extends DropdownAdminFilter
{
   protected function handleDropdown($selected, $query)
   {
       switch ($selected) {
           case 'system':
               $query->where('layout', 'system');
               break;
           case 'customer':
               $query->where('layout', 'customer');
               break;
       }
   }

   protected function dropdowns(): array
   {
       return [
           [
               'value' => '',
               'name' => 'View All',
           ],
           [
               'value' => 'customer',
               'name' => 'Customer',
           ],
           [
               'value' => 'system',
               'name' => 'System',
           ],
       ];
   }
}
How do I create an options date range admin filter?
The options date range admin filter works in the same way as the date range admin filter but displays some dynamic options to the user on the frontend. These dynamic options are especially useful when users save their applied filters.
To create an options date range admin filter you need to create a class that extends Aero\Admin\Filters\OptionsDateRangeAdminFilter and implements the handleDateRange method.
handleDateRange Method
This method is executed when a date is set and accepts 3 parameters. The first parameter is a Carbon object for the selected start date, the second parameter is a Carbon object for the selected end date, and the third parameter is the query.
You can switch this filter to not use past options (such as yesterday, last 7 days, last 30 days) by setting the $lastMode property to false. If this property is false the options will become future options (such as tomorrow, next 7 days, next 30 days).
<?php

namespace Aero\Admin\Filters\Order;

use Aero\Admin\Filters\OptionsDateRangeAdminFilter;

class OrderDeliverOnDateAdminFilter extends OptionsDateRangeAdminFilter
{
   protected $lastMode = false;

   protected function handleDateRange($startDate, $endDate, $query)
   {
       $query->whereBetween('deliver_on', [$startDate, $endDate]);
   }
}
How do I create a date range admin filter?
To create a date range admin filter you need to create a class that extends Aero\Admin\Filters\DateRangeAdminFilter and implements the handleDateRange method.
handleDateRange Method
This method is executed when a date is set and accepts 3 parameters. The first parameter is a Carbon object for the selected start date, the second parameter is a Carbon object for the selected end date, and the third parameter is the query.
<?php

namespace Acme\MyModule\Filters;

use Aero\Admin\Filters\DateRangeAdminFilter;

class CreatedAtAdminFilter extends DateRangeAdminFilter
{
   protected function handleDateRange($startDate, $endDate, $query)
   {
       $query->whereBetween('created_at', [$startDate, $endDate]);
   }
}
How do I create a checkbox list admin filter?
To create a checkbox list admin filter you need to create a class that extends Aero\Admin\Filters\CheckboxListAdminFilter and implements the handleCheckboxList and checkboxes methods.
handleCheckboxList Method
This method is executed when any checkboxes are checked and accepts two parameters. The first parameter is an array of the selected items and the second parameter is the query.
checkboxes Method
This method provides the results shown in the rendered checkbox list on the frontend. It needs to return an array that has id, name, and url as keys. The url key should use the $this->getUrlFor() helper method to create a url for the id.
<?php

namespace Acme\MyModule\Filters;

use Aero\Admin\Filters\CheckboxListAdminFilter;
use Aero\Cart\Models\OrderStatus;

class OrderStatusStateAdminFilter extends CheckboxListAdminFilter
{
   protected function handleCheckboxList(array $selected, $query)
   {
       $query->whereIn('state', $selected);
   }

   protected function checkboxes(): array
   {
       return OrderStatus::query()->distinct('state')->get()->map(function ($status) {
           return [
               'id' => $status->state,
               'name' => ucwords(implode(' ', explode('_', $status->state))),
               'url' => $this->getUrlFor($status->state),
           ];
       })->toArray();
   }
}
How do I create a custom admin filter?
To create a custom admin filter you need to create a class that extends Aero\Admin\Filters\AdminFilter and implements the handle method.
handle Method
This method is executed on every request made to a report or resource list with your filter and accepts 2 parameters. The first parameter is a Symfony\Component\HttpFoundation\ParameterBag, and the second parameter is the query.
render Method
This method defines how the filter is rendered. By default it will return a view (that you can set with the protected $view property) and pass in the options() and viewData() arrays.
stateFields Method
This method returns an array of names for the parameters this filter uses in the request. It’s important that if you use any parameters outside of the default parameter (which uses the $this->key() for the name) that you override this method and return them in the array. This method is used to gather all of the fields that should be reset to remove your filter.
options Method
This method returns an array of data that is passed to the view by the render method. If you’re creating a new filter that may be used by many classes it is a good idea to use this method instead of the viewData method so that classes that extend your class can use the viewData method if required.
viewData Method
This method returns an array of data that is passed to the view by the render method.
Here is the code for our date range admin filter implementation:
<?php

namespace Aero\Admin\Filters;

use Symfony\Component\HttpFoundation\ParameterBag;

abstract class DropdownAdminFilter extends AdminFilter
{
   protected $view = AdminFilterTypes::DROPDOWN;

   protected function selectedOption()
   {
       return request()->input($this->key());
   }

   protected function options(): array
   {
       return [
           'title' => $this->title(),
           'key' => $this->key(),
           'options' => $this->dropdowns(),
           'selected' => $this->selectedOption(),
       ];
   }

   public function handle(ParameterBag $parameters, $query)
   {
       if (($selected = $parameters->get($this->key())) && $selected != '') {
           $this->handleDropdown($selected, $query);
       }
   }

   abstract protected function handleDropdown($selected, $query);

   abstract protected function dropdowns(): array;
}
What is a dashboard lens?
Dashboard lenses are the blocks of content that make up the interactive part of the admin dashboard.
They provide an overview of various stats such as your total revenue, orders, and your top selling products.
There are a number of default lenses and you can also create your own.
What are the default dashboard lenses available?
The default dashboard lenses are stored in the admin configuration file as an array called dashboard_lenses. You can add or remove dashboard lens classes from this array.
| Key | Class | Permission |
|---|---|---|
| revenue-lens | Aero\Admin\Lenses\RevenueLens | reports.orders |
| average-order-value-lens | Aero\Admin\Lenses\AverageOrderValueLens | reports.orders |
| top-shipping-countries-lens | Aero\Admin\Lenses\TopShippingCountriesLens | reports.orders |
| returns-rate-lens | Aero\Admin\Lenses\ReturnsRateLens | reports.orders |
| orders-lens | Aero\Admin\Lenses\OrdersLens | reports.orders |
| top-selling-manufacturers-lens | Aero\Admin\Lenses\TopSellingManufacturersLens | reports.catalog |
| top-selling-items-lens | Aero\Admin\Lenses\TopSellingItemsLens | reports.catalog |
How do I create a custom dashboard lens?
To create a dashboard lens you need to create a class that extends Aero\Admin\AdminLens and implements the data method.
data Method
This method is executed every time the lens needs data (when the dashboard loads or when the dashboard date range is changed). This method must return an Illuminate\Http\JsonResponse because it is called on the frontend by javascript.
data Method Parameters
| Type | Description |
|---|---|
| Request | The first parameter is the request. |
| Array | The second parameter is an array that holds the start and end date selected for the dashboard stats. This array has a start and end key that has the dates. |
| Array | The third parameter is an array that holds information about the comparison dates. This array has a type key that is 1 for the same period prior, 2 for the same period 1 year ago, or 3 for a custom period. This array has a date key that has the same structure as the second parameter. This array also has a text key that holds text to be displayed to explain the comparison. |
Here is the code for our top shipping countries implementation:
<?php

namespace Aero\Admin\Lenses;

use Aero\Admin\AdminLens;
use Aero\Cart\Models\Order;
use Illuminate\Http\JsonResponse;
use Illuminate\Http\Request;
use Illuminate\Support\Str;

class TopShippingCountriesLens extends AdminLens
{
   protected $title = 'Top Shipping Countries';

   protected static $permission = 'reports.orders';

   protected static $containerClass = 'row-span-2';

   protected $view = 'admin::lenses.percentage-list';

   public function data(Request $request, array $date, array $compare): JsonResponse
   {
       $countries = Order::visible()->with('shippingAddress.country')->whereHas('shippingAddress')
           ->whereBetween('ordered_at', [$date['start'], $date['end']])->get()
           ->groupBy('shippingAddress.country.name')
           ->map(function ($group, $key) {
               return [
                   'name' => $key,
                   'count' => $group->count(),
                   'percentage' => 0,
               ];
           })->sortByDesc('count')->take(5);

       $total = $countries->reduce(function ($count, $country) {
           return $count + $country['count'];
       }, 0);

       $countries->transform(function ($country) use ($total) {
           $country['value'] = number_format(($country['count'] / $total) * 100, 2);
           $country['text'] = $country['count'].' '.Str::plural('order', $country['count']);
           $country['percentage'] = $country['value'].'%';

           return $country;
       });

       return response()->json([
           'items' => $countries,
       ]);
   }
}
How do I use a custom view for my dashboard lens?
You can optionally make your dashboard lens use a custom view. To do this you need to set the protected $view string on your lens to the view you would like to use.
<?php

namespace Aero\Admin\Lenses;

use Aero\Admin\AdminLens;
use Illuminate\Http\JsonResponse;
use Illuminate\Http\Request;

class TopShippingCountriesLens extends AdminLens
{
   protected $view = 'admin::lenses.percentage-list';

   public function data(Request $request, array $date, array $compare): JsonResponse
   {
       return response()->json([]);
   }
}
Your view will have access to Blade and Vue as it is rendered as a slot. You will have access to the following variables:
| Variable | Type | Description |
|---|---|---|
| lens.data | Vue | This is an object that holds the response from the data method of your admin lens. You can effectively pass any data you want in the json response and have access to it in Vue through this variable. |
| lens.date | Vue | This is an object that has start, end and compare keys. |
| lens.loading | Vue | This is a boolean that is true while the lens is making an API call to get its data. |
| lens.notLoading | Vue | This is a boolean that is false unless the lens is making an API call. |
| lens.noData | Vue | This is a boolean that is true if the store has no orders. |
| lens.hasData | Vue | This is a boolean that is true if the store has orders. |
| lens.renderDateGetVariables | Vue | This returns an empty string or the selected date formatted as the $dateGetVariables property on the lens class describes. |
| $title | Blade | This is the value of the $title property on your lens class. |
| $link | Blade | This is the value of the link() function on your lens class. |
| $noTextData | Blade | This is the value of the $noDataText property on your lens class. |
Here is the code for our default lens view:
<div class="card h-full relative">
   <svg class="w-4 h-4 absolute pin-t pin-r m-4 text-grey-light stroke-current [ animation-spin ]" xmlns="http://www.w3.org/2000/svg" viewBox="0 0 18.111 18.068" v-if="lens.loading">
       <path d="M20,4V9h-.582M4.062,11A8,8,0,0,1,19.418,9m0,0H15M4,20V15h.581m0,0a8,8,0,0,0,15.357-2M4.581,15H9" transform="translate(-2.945 -2.964)" fill="none" stroke-linecap="round" stroke-linejoin="round" stroke-width="2"/>
   </svg>
   <svg class="w-4 h-4 absolute pin-t pin-r m-4 text-success stroke-current [ animation-fade-out ]" xmlns="http://www.w3.org/2000/svg" viewBox="0 0 18.11 18.07" v-else>
       <g fill="none" stroke-linecap="round" stroke-linejoin="round" stroke-width="2">
           <path d="M2.06 10.03l4 4 10-10" data-name="Path 103"/>
       </g>
   </svg>

   <h3 class="uppercase text-base font-normal text-text h-auto p-0 mb-3">{{ $title }}</h3>

   <div class="flex flex-wrap -mx-3">
       <div class="w-1/2 px-3 mb-6" v-if="lens.loading || lens.noData">
           <div class="mb-1">
               <template v-if="lens.loading">
                   <skeleton-box height="2.125rem" width="4rem" />
               </template>
               <template v-else-if="lens.noData">
                   <p class="text-3xl font-medium mb-1">–</p>
               </template>
           </div>
           <template v-if="lens.loading">
               <skeleton-box width="9rem" height="0.8125rem" />
           </template>
           <template v-else-if="lens.noData">
               <p class="text-xs">{{ $noDataText }}</p>
           </template>
       </div>

       <div class="w-1/2 px-3 mb-6" v-if="lens.notLoading && lens.hasData" v-for="data in lens.data" :key="data.currency_code">
           <div class="mb-1">
               <p class="text-3xl font-medium" v-html="data.text"></p>
           </div>
           <p class="text-xs"><strong v-text="data.compare.percentage" class="font-medium" :class="{ 'text-success' : data.compare.up, 'text-error' : ! data.compare.up }"></strong> <span v-text="data.compare.text"></span></p>
       </div>
   </div>

   @isset($link)
       <a class="dashboard-link" v-if="lens.noData">{{ $link['text'] }}</a>
       <a class="dashboard-link" :href="'{{ $link['route'] }}' + lens.renderDateGetVariables" v-else>{{ $link['text'] }}</a>
   @endif
</div>
Adding Permissions to your Dashboard Lens
You can optionally make your dashboard lens require a permission (if the user doesn’t have the permission then the lens will not be rendered). To do this you need to set the protected static $permission string on your lens class to the permission you would like to use.
<?php

namespace Aero\Admin\Lenses;

use Aero\Admin\AdminLens;
use Illuminate\Http\JsonResponse;
use Illuminate\Http\Request;

class TopShippingCountriesLens extends AdminLens
{
   protected static $permission = 'dashboard.lens.orders';

   public function data(Request $request, array $date, array $compare): JsonResponse
   {
       return response()->json([]);
   }
}
How do I add a custom dashboard lens to the dashboard?
To add your custom dashboard lens to the dashboard you need to register it with the admin and the admin dashboard.
To register your dashboard lens with the admin you need to call the Aero\Admin\Facades\Admin facade registerLens method and pass in your dashboard lens class.
<?php

namespace Acme\MyModule;

use Aero\Admin\Facades\Admin;
use Aero\Admin\Lenses\RevenueLens;
use Aero\Common\Providers\ModuleServiceProvider;

class ServiceProvider extends ModuleServiceProvider
{
   public function setup()
   {
       Admin::registerLens(RevenueLens::class);
   }
}
Once you have registered your dashboard lens with the admin you are able to extend Aero\Admin\Http\Responses\AdminDashboardPage and add your lens using the setLens, addLens, addLensBefore, or addLensAfter methods.
setLens Method
This method accepts a key and a lens class. The key's current value will be replaced with the lens class you provide.
addLens Method
This method accepts a key and a lens class. When using this method your lens will be added as the first dashboard lens.
addLensBefore Method
This method accepts the same parameters as the addLens method but additionally accepts a third parameter, the key of the lens this new lens should be added before.
addLensAfter Method
This method accepts the same parameters as the addLens method but additionally accepts a third parameter, the key of the lens this new lens should be added after.
Finding the Current Dashboard Lenses Keys
If you do not know the keys of the current dashboard lenses you can use this code snippet to dump the current keys out when visiting the dashboard.
<?php

namespace Acme\MyModule;

use Aero\Admin\Http\Responses\AdminDashboardPage;
use Aero\Common\Providers\ModuleServiceProvider;

class ServiceProvider extends ModuleServiceProvider
{
   public function setup()
   {
       AdminDashboardPage::extend(function (AdminDashboardPage $page) {
           dd($page->getLenses()->keys());
       });
   }
}
<?php

namespace Acme\MyModule;

use Aero\Admin\Facades\Admin;
use Aero\Admin\Http\Responses\AdminDashboardPage;
use Aero\Admin\Lenses\RevenueLens;
use Aero\Common\Providers\ModuleServiceProvider;

class ServiceProvider extends ModuleServiceProvider
{
   public function setup()
   {
       Admin::registerLens(RevenueLens::class);

       AdminDashboardPage::extend(function (AdminDashboardPage $page) {
           $page->addLensBefore('revenue-lens', RevenueLens::class, 'average-order-value-lens');
       });
   }
}
How do I remove a dashboard lens from the dashboard?
You are able to extend Aero\Admin\Http\Responses\AdminDashboardPage and use the removeLens method. You will need to pass in the key of the lens that you want to remove.
<?php

namespace Acme\MyModule;

use Aero\Admin\Http\Responses\AdminDashboardPage;
use Aero\Admin\Lenses\RevenueLens;
use Aero\Common\Providers\ModuleServiceProvider;

class ServiceProvider extends ModuleServiceProvider
{
   public function setup()
   {
       AdminDashboardPage::extend(function (AdminDashboardPage $page) {
           $page->removeLens('revenue-lens');
       });
   }
}
How do I extend existing reports?
Reports can be extended using a pipeline from your modules service providers setup method or your projects app service providers boot method. You can read more about pipelines here (link).
Adding a Column
To add columns to a table you can use the addColumn, addColumnBefore, or addColumnAfter methods from within the pipeline. These methods return a usual report table column which allows you to chain on the other available column methods.
addColumn Method
This method accepts a column header and a closure that defines how the column will be rendered. A column added with this method will be added as the first column.
addColumnBefore Method
This method accepts the same parameters as the addColumn method but additionally accepts a third parameter, the key of the column this new column should be added before.
addColumnAfter Method
This method accepts the same parameters as the addColumn method but additionally accepts a third parameter, the key of the column this new column should be added after.
Finding the Current Column Keys
If you do not know the keys of the current columns you can use this code snippet to dump the current keys out when visiting the report.
<?php

namespace Acme\MyModule;

use Aero\Admin\Reports\Implementations\SalesReport;
use Aero\Common\Providers\ModuleServiceProvider;

class ServiceProvider extends ModuleServiceProvider
{
   public function setup()
   {
       SalesReport::extend(function (SalesReport $report) {
           dd($report->table()->getColumns()->map->key());
       });
   }
}
<?php

namespace Acme\MyModule;

use Aero\Admin\Reports\Implementations\SalesReport;
use Aero\Common\Providers\ModuleServiceProvider;

class ServiceProvider extends ModuleServiceProvider
{
   public function setup()
   {
       SalesReport::extend(function (SalesReport $report) {
           $report->table()->addColumn('My Column', function ($row) {
               return 'example';
           })
           ->setExportContent(function ($row) {
               return 'export content';
           });

           $report->table()->addColumnBefore('Before SKU', function ($row) {
               return $row->sku;
           }, 'sku');

           $report->table()->addColumnAfter('After Sku', function ($row) {
               return $row->sku;
           }, 'sku');
       });
   }
}
Adding a Lens
To add a lens to a report you can use the addLens method from within the pipeline. This method expects you to pass a report lens class. You can create a report lens class as shown in the article "How do I add Lenses to my custom Report?".
<?php

namespace Acme\MyModule;

use Acme\MyModule\Reports\Lenses\TotalRevenueLens;
use Aero\Admin\Reports\Implementations\SalesReport;
use Aero\Common\Providers\ModuleServiceProvider;

class ServiceProvider extends ModuleServiceProvider
{
   public function setup()
   {
       SalesReport::extend(function (SalesReport $report) {
           $report->addLens(TotalRevenueLens::class);
       });
   }
}
Adding a Filter
To add a filter to a report you can use the addFilter method from within the pipeline. This method expects you to pass an admin filter class. You can create an admin filter class as shown in the article "How do I add Admin Filters to my custom Report?".
<?php

namespace Acme\MyModule;

use Aero\Admin\Filters\Order\OrderStatusAdminFilter;
use Aero\Admin\Reports\Implementations\OrderBreakdownReport;
use Aero\Common\Providers\ModuleServiceProvider;

class ServiceProvider extends ModuleServiceProvider
{
   public function setup()
   {
       OrderBreakdownReport::extend(function (OrderBreakdownReport $report) {
           $report->addFilter(OrderStatusAdminFilter::class);
       });
   }
}
How do I create a custom report?
To create and register a custom report you need to use the Aero\Admin\AdminReport facade inside of your app service providers boot method or module service providers setup method.
The facade requires a class that extends Aero\Admin\Reports\Report. Additionally, you can provide a title and summary (shown in the reports list in the admin) and any permissions required to use the report.
<?php

namespace Acme\MyModule;

use Acme\MyModule\Reports\OrdersReport;
use Aero\Admin\AdminReport;
use Aero\Common\Providers\ModuleServiceProvider;

class ServiceProvider extends ModuleServiceProvider
{
   public function setup()
   {
       AdminReport::create(OrdersReport::class)
           ->title('Simple Orders Report')
           ->summary('View a simple report for your orders')
           ->permissions('orders.view');
   }
}
Your report class must implement a newQuery method that must return a Illuminate\Database\Eloquent\Builder. This method provides the query your report will run from.
<?php

namespace Acme\MyModule\Reports;

use Aero\Admin\Reports\Report;
use Aero\Cart\Models\Order;
use Illuminate\Database\Eloquent\Builder;

class OrdersReport extends Report
{
   protected function newQuery(): Builder
   {
       return Order::with([
           'status', 'items', 'currency', 'discounts', 'payments.method',
       ]);
   }
}
How do I add exporters to my custom report?
To add an exporter to your report you need to ensure the report uses the Aero\Admin\Reports\Traits\CanExport trait and that the exporter class is in the reports protected static $exports array.
By default Aero provides a CSV, XML, and JSON exporter.
<?php

namespace Acme\MyModule\Reports;

use Aero\Admin\Reports\Exporters\CSVExporter;
use Aero\Admin\Reports\Exporters\JSONExporter;
use Aero\Admin\Reports\Exporters\XMLExporter;
use Aero\Admin\Reports\Report;
use Aero\Admin\Reports\Traits\CanExport;
use Aero\Cart\Models\Order;
use Illuminate\Database\Eloquent\Builder;

class OrdersReport extends Report
{
   use CanExport;

   protected function newQuery(): Builder
   {
       return Order::with([
           'status', 'items', 'currency', 'discounts', 'payments.method',
       ]);
   }

   protected static $exports = [
       CSVExporter::class,
       XMLExporter::class,
       JSONExporter::class,
   ];
}
Creating a Report Exporter
You need to create a class for your exporter that extends Aero\Admin\Reports\ReportExporter and implements the required public handle function.
Handle Parameters
| Type | Description |
|---|---|
| Collection | The first parameter is a collection of the exportable tables columns. |
| Builder | The second parameter is the query that should be used to get the data for the export. |
| String | The third parameter is the key of the table being exported. |
<?php

namespace Acme\MyModule\Reports\Exporters;

use Aero\Admin\Reports\ReportExporter;
use Carbon\Carbon;

class CustomExporter extends ReportExporter
{
   public function handle($columns, $rows, $key)
   {
       $file = $key.'-'.Carbon::now().'.csv';

       return response()->streamDownload(function () use ($columns, $rows) {
           $file = fopen('php://output', 'wb');

           fputcsv($file, $columns->map->header()->toArray());

           $rows->chunk(100, function ($chunk) use ($file, $columns) {
               foreach ($chunk as $row) {
                   $rowData = [];

                   foreach ($columns as $column) {
                       $rowData[] = $column->exportContent($row);
                   }

                   fputcsv($file, $rowData);
               }
           });

           fclose($file);
       }, $file,
           ReportExporter::getHttpHeaders('text/csv', $file)
       );
   }
}
Now you need to add your newly created exporter to your report as shown at the start of this article.
How do I add admin filters to my custom report?
You need to create an Admin Filter class as shown in the article "How do I create a custom report?".
To register your newly created admin filter with your report you need to ensure the report uses the Aero\Admin\Reports\Traits\HasFilters trait and that your admin filter class is in the reports protected static $filters array.
<?php

namespace Acme\MyModule\Reports;

use Aero\Admin\Filters\Order\OrderOrderedAtDateAdminFilter;
use Aero\Admin\Reports\Report;
use Aero\Admin\Reports\Traits\HasFilters;
use Aero\Cart\Models\Order;
use Illuminate\Database\Eloquent\Builder;

class OrdersReport extends Report
{
   use HasFilters;

   protected function newQuery(): Builder
   {
       return Order::with([
           'status', 'items', 'currency', 'discounts', 'payments.method',
       ]);
   }

   protected static $filters = [
       OrderOrderedAtDateAdminFilter::class,
   ];
}
How do I add lenses to my custom report?
You need to create a class for your lens that extends Aero\Admin\Reports\ReportLens and implements the required public value function. The value function will return a string used to display your lens.
<?php

namespace Acme\MyModule\Reports\Lenses;

use Aero\Admin\Reports\ReportLens;

class TotalOrdersLens extends ReportLens
{
   protected function value()
   {
       return $this->query->count();
   }
}
You can optionally override the render method to change the view that your lens uses. The default render method:
public function render()
{
   return view('admin::reports.lens', ['title' => $this->title(), 'content' => $this->value()]);
}
You can also additionally override the title method to change the title shown on the frontend. By default this method returns a title that is generated from the lens class name.
Registering a Lens with your Report
To register your newly created lens with your report you need to ensure the report uses the Aero\Admin\Reports\Traits\HasLens trait and that your lens class is in the reports protected static $lenses array.
<?php

namespace Acme\MyModule\Reports;

use Acme\MyModule\Reports\Lenses\TotalOrdersLens;
use Aero\Admin\Reports\Report;
use Aero\Admin\Reports\Traits\HasLens;
use Aero\Cart\Models\Order;
use Illuminate\Database\Eloquent\Builder;

class OrdersReport extends Report
{
   use HasLens;

   protected function newQuery(): Builder
   {
       return Order::with([
           'status', 'items', 'currency', 'discounts', 'payments.method',
       ]);
   }

   protected static $lenses = [
       TotalOrdersLens::class,
   ];
}
How do I add a table to my custom report?
You need to create a class for your table that extends Aero\Admin\Reports\ReportTable and implements the required public columns function. This columns function will be used to return an array containing your tables columns.
<?php

namespace Acme\MyModule\Reports\Tables;

use Aero\Admin\Reports\ReportTable;

class OrdersReportTable extends ReportTable
{
   public function columns(): array
   {
       return [

       ];
   }
}
Registering a Table with your Report
To register your newly created table with your report you need to ensure the report uses the Aero\Admin\Reports\Traits\HasTables trait and that your table class is in the reports protected static $tables array.
<?php

namespace Acme\MyModule\Reports;

use Acme\MyModule\Reports\Tables\OrdersReportTable;
use Aero\Admin\Reports\Report;
use Aero\Admin\Reports\Traits\HasTables;
use Aero\Cart\Models\Order;
use Illuminate\Database\Eloquent\Builder;

class OrdersReport extends Report
{
   use HasTables;

   protected function newQuery(): Builder
   {
       return Order::with([
           'status', 'items', 'currency', 'discounts', 'payments.method',
       ]);
   }

   protected static $tables = [
       OrdersReportTable::class,
   ];
}
Adding Columns to your Table
To add columns to your table you need to use the Aero\Admin\Reports\ReportTableColumn facade in your tables columns array method.
ReportTableColumn::create Parameters
| Type | Description |
|---|---|
| String | The first parameter is the header of the column. |
| Closure | The second parameter is a closure that handles the display content for the column. The closure accepts a $row variable and returns a string or view value. |
| String | Null |
<?php

namespace Acme\MyModule\Reports\Tables;

use Aero\Admin\Reports\ReportTable;
use Aero\Admin\Reports\ReportTableColumn;

class OrdersReportTable extends ReportTable
{
   public function columns(): array
   {
       return [
           ReportTableColumn::create('Date', function ($row) {
               if ($row->ordered_at) {
                   return $row->ordered_at->format('D jS M, H:i');
               }

               return view('admin::reports.partials.muted-created-at', compact('row'));
           }),

           ReportTableColumn::create('Order', function ($row) {
               return $row->reference;
           }),
       ];
   }
}
Making your Column Searchable
You can use the setSearchAction method to define how your column is searched.
| Type | Description |
|---|---|
| Closure | The first parameter is a closure that is called when your column is being used for a search. The closure is passed the query and search term. |
| String | Null |
ReportTableColumn::create('Order', function ($row) {
   return $row->reference;
})
->setSearchAction(function ($query, $term) {
   $term = ltrim($term, '#');

   $query->whereLower('reference', 'like', "%{$term}%");
}, 'Order Reference')
Making your Column Not Exportable
To make your column not exportable you can use the notExportable method.
ReportTableColumn::create('Order', function ($row) {
   return $row->reference;
})
->notExportable()
Setting your Columns Export Content
You can use the setExportContent method to define how your column should return data when exporting. This is useful for times where instead of returning a view on the Aero Admin you want your column to return raw data.
The setExportContent method accepts a closure that is passed the row.
ReportTableColumn::create('Date', function ($row) {
   if ($row->ordered_at) {
       return $row->ordered_at->format('D jS M, H:i');
   }

   return view('admin::reports.partials.muted-created-at', compact('row'));
})
->setExportContent(function ($row) {
   if ($row->ordered_at) {
       return $row->ordered_at->format('D jS M, H:i');
   }

   return $row->created_at->format('D jS M, H:i');
})
Making your Column Invisible
You can use the invisible method to make your column invisible. Do note that your column will still be visible in an export.
ReportTableColumn::create('Order', function ($row) {
   return $row->reference;
})
->invisible()
Setting your Columns Position
Columns are ordered by an Integer position value (lowest numbers go first). You can set a column's position using the position method. On the default Aero reports we increment each rows column.
ReportTableColumn::create('Order', function ($row) {
   return $row->reference;
})
->position(1)