Import
Bring content, blocks, and feed data in and out of an Aero project.
In this guide
- Export content blocks
- Import content blocks
- Block item attributes
- Storefront content blocks
- Google categories
- Google Shopping setup
- Export Shopping feed
- Generate Shopping feed
How do I export content blocks?
In order to export content blocks, we require an Aero package. To install this package, type the following command in the project root directory:
composer require aerocargo/blocks-import-export
After the package has been installed successfully, we can navigate to the admin, then to Content Management, and lastly to the Blocks. We can now use the bulk action to select which blocks we wish to export, otherwise if we wish to export all of the content blocks we select the checkbox next to the name header field of the table.
Finally, we apply the “Export blocks” bulk action at which point the export will generate the necessary blocks and download them to the user’s browser.
How do I import content blocks?
In order to export content blocks, we will require an Aero package. To install this package, type the following command in the project root directory:
composer require aerocargo/blocks-import-export
After installing the package, we can navigate to the admin then Content Management and finally, Blocks. In the top right corner of this page, we now have a button for importing blocks.
The .zip file required by the importer can only be generated by the content blocks exporter. If we do have an exported .zip file we can simply upload it within the modal that appears on button click. After uploading the .zip file and letting the blocks import, they should appear in the list.
How do I add additional information to block items?
In some cases, more data is needed than the default values provided on each block item. For example, a promotional image may require a call-to-action link, or a sale link in the header navigation needs a custom class to turn the text red. These features are possible through the use of custom attributes, which are set on each block item.
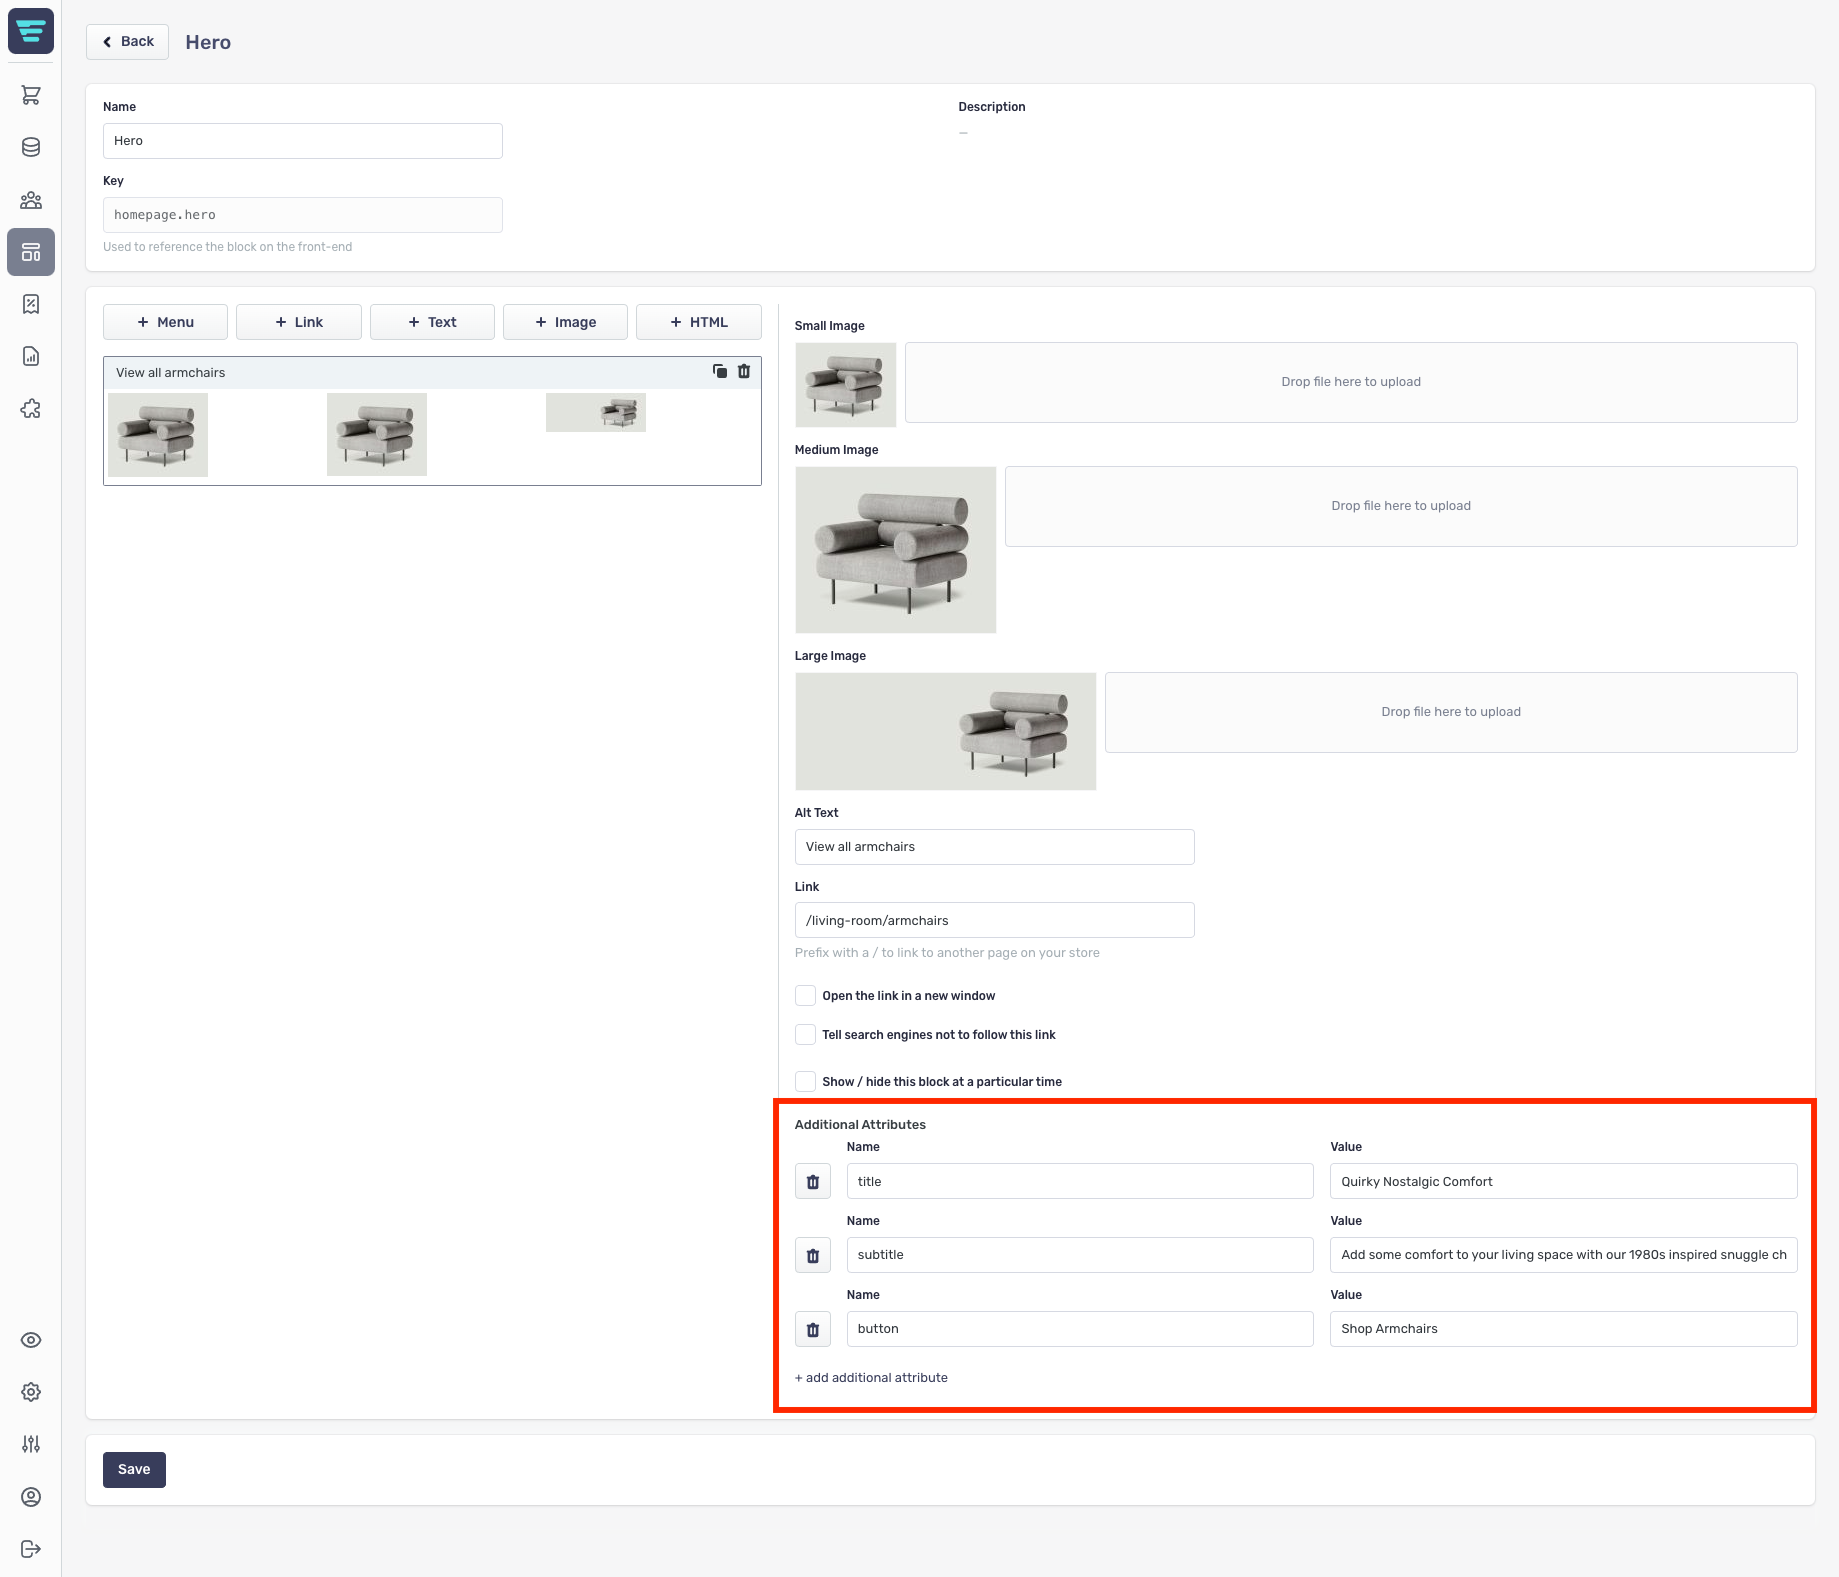
Once the attributes have been defined against an item, they can be accessed on the storefront:
{% set hero = block_item('homepage.hero') %}
<div class="relative w-full">
    {{ hero | raw }}
    <a href="{{ hero.href }}" class="absolute bottom-0 mb-10 mx-auto">{{ hero.additional('button_text') }}</a>
</div>
How do I display content blocks on the storefront?
The structure of the views for the block items is shown below. If you are creating your own theme or custom storefront, you must ensure these files are present in order for the content blocks to display correctly.
└─ resources
    └─ views
        └─ blocks
            └─ html.twig
            └─ image.twig
            └─ link.twig
            └─ menu.twig
            └─ text.twig
A single block item
To show a single block item, use the block's key:
{{ block_item('product-page.confidence-builder') }}
This will show the first available block item in the block. To show a different block item, provide the position as the second parameter:
{% if block_exists('homepage.brand-heroes') %}
    <div class="flex w-full flex-wrap">
        <div class="w-full md:w-1/2">
            {{ block_item('homepage.brand-heroes', 0) }}
        </div>
        <div class="w-full md:w-1/2">
            {{ block_item('homepage.brand-heroes', 1) }}
        </div>
    </div>
{% endif %}
Passing data to block items
In some cases, a block item may need data to be passed from the theme. This is especially useful for themes, which dictate the image dimensions.
{{ block_item('listings.loyalty-banner', 0, {
    sizes: {
        small: { width: 400, height: 200 },
        medium: { width: 600, height: 260 },
        large: { width: 1024, height: 300 },
    },
    options: ['contain', {quality: 90}],
}) }}
A collection of block items
To show all block items in a content block:
{{ block_items('product-page.confidence-builders') }}
Should you need to limit the number of items returned in the collection, pass a limit as the second parameter:
{{ block_items('product-page.confidence-builders', 3) }}
If the block items need to be wrapped in elements to style their position, the following approach can be used:
{% if block_exists('homepage.main-hero') %}
    {% set main_hero = block_items('homepage.main-hero', null, {
        sizes: {
            small: { width: 360, height: 360 },
            medium: { width: 660, height: 560 },
            large: { width: 1280, height: 600 }
        }
    }) %}
    <div class="flex w-full flex-wrap">
        {% for hero in main_hero %}
            <div class="w-full">{{ hero | raw }}</div>
        {% endfor %}
    </div>
{% endif %}
Remember to use the raw filter to ensure the block item HTML isn't escaped.
How do I assign Google categories?
Google categories can be assigned to categories, or directly to the product. It can be set up either way as the mapping tool automatically detects the ones that have been set up. There is also a way of mapping whether a google category is grabbed from categories or the products. It can be done the following way:
To categories
- Navigate to categories under Catalog Management.
- Choose the category we want to assign a Google Category to from the bottom of the page.
- Save the category.
To products
- Navigate to products under Catalog Management.
- Choose the category we want to assign a Google Category to from the bottom of the page.
- Save the product.
How do I configure the Google Shopping feed?
Generating the taxonomy
Generating the taxonomy table is a required task after we’ve initially installed the package, and is the source of all the categories provided by google shopping.
To generate the taxonomies table we can:
- Navigate to the modules’ section in the admin and generate taxonomies through the modules’ interface
- Run a command from the root project directory:
php artisan aero:google:taxonomies
Setting a CRON run at time
We can specify the time at which the taxonomies should be updated automatically. This can be changed by:
- Editing the config.php file and manually adding the CRON time
- Setting the value in the admin modules’ section under Configuration in the Google Shopping module.
Query parameters
Query parameters are used for every variant link that is input into the XML feed. These can be used to grab different prices such as included and excluded VAT. To set query parameters:
- Navigate to the modules section of the admin, go into Google Shopping and Configure.
- Add your query parameters without any double or single quotation symbols in the following format:
KEY=VALUE for a single parameter
KEY=VALUE, KEY2=VALUE2 and so on for multiple parameters
- Click on save
Each of our variants should now be output into the XML feed with the query parameters we have specified.
How do I export the Google Shopping feed?
To export the feed we need to navigate into the module’s section in the admin, and then to Google Shopping. Provided we’ve generated the taxonomies and have configured the package correctly, we can click on the Export button to begin mapping out the feed.
Mapping allows the feed to use alternative fields as a data source for a certain mapping as well as setting a fallback, in case the data source is empty.
How do I generate a Google Shopping feed?
In order to generate a Google Shopping feed, it is necessary to install an Aero dependency in form of the aerocargo/google-shopping package from agora.aerocommerce.com. The feed needs to then be mapped so that it knows which fields to use and is made aware of any fallbacks, such as what to do when a field is missing a value.
More developer-specific information about the Google Shopping feed can be found on the Google Shopping module page in agora.
Installing the package
To install the package, simply run the following command from the project’s root directory:
composer require aerocargo/google-shopping
After the package has been installed:
php artisan migrate
And finally, if we wish to modify any of the configuration:
php artisan vendor:publish --provider="Aerocargo\GoogleShopping\ServiceProvider"